There are a few things that I can each year and other things I just buy already canned. The salsa recipe I posted I always can. You can't find salsa that yummy canned in the grocery store. I've already made one batch and I'm actually making another batch as we speak. Another one of those things that you can't pick up at the store are Dilly Beans. Mmmm. I love Dilly Beans. If you like Dill Pickles, you'll love Dilly Beans! I'll also post my grandmother's Dill Pickle Recipe later. My garden is bursting with beans right now so I just made my first batch. This is my grandmother's recipe.
Dilly Beans
2 lbs. green beans, trimmed
1 tsp. cayenne pepper
4 cloves garlic
4 heads dill
2 1/2 c. water
2 1/2 c. vinegar
1/4 c. pickling/canning salt *note* Pickling salt is different than iodized salt. You'll find it next to the other salts.
Pack beans, lengthwise into hot pint jars leaving 1/4 inch head space. To each pint add 1/4 tp cayenne pepper, 1 clove garlic, and 1 dill head. Combine remaining ingredients and bring to boiling. Pour boiling hot over beans leaving 1/4 inch head space. Adjust caps. Process pints and quarts 10 minutes in boiling water bath.
Yield: 4 pints
Note: Let beans stand for 2 weeks before tasting to allow the flavor to develop.
Tuesday, September 1, 2009
Saturday, August 15, 2009
Cheaters Bruschetta
Another one of my favorite ways to eat tomatoes are as a bruschetta. I take the easy way out on this one. I slice some french bread, drizzle with olive olive and toast it in the oven for a bit. Then I take chive cream cheese and spread it on the french bread slices. On top of that I sometimes put some thinly sliced roast beef, tomato slice, and slices of olives. It is also good with just the cream cheese, basil, and olives. Whenever I take this as an appetizer people always ask how I make it. I think the secret or special ingredient is always home grown tomatoes.
Tomatoes
We've been enjoying our tomatoes over the last month. There are so many great ways to enjoy them, and it's so fun to share them. I love to eat fresh salsa, but I also like to can it so I can enjoy it while snow is on my garden. Every year I like to can salsa, and this is by far my favorite salsa recipe to can. Canning salsa is not difficult, but it does take a lot of time and patience to make it. The rewards are definately worth it!
10 lbs tomatoes (romas are my favorite for this, but any kind will do)
4 onions
2 green peppers
3 small cans green chilis or 2, 3 fresh chopped
4 jalapenos chopped (You can take the ribs out of the jalapenos if you don't want the heat. I always make one batch with more jalapenos. This recipe isn't really spicy, so don't worry about that too much)
1 cup vinegar
2 Tbs. salt
2 Tbs. sugar
Peel and mash tomatoes: For this step I get a pot of boiling water, pierce the skin of the tomatoes, drop them in for a few seconds, take them out and when the tomato cools down you can peel the skin right off. I throw my tomatoes in a food processor or blender and pulse them.
Chop onions and green peppers, and add to mashed tomatoes. Add the other ingredients and cook for 3 hours. It may seem like a long time, but it really thickens the salsa and also meshes the flavors well. Process in pint jars for 30 minutes. If you need info on processing or canning this website has a ton of info: http://www.pickyourown.org/allaboutcanning.htm. If you know me and would like help (I have the canning supplies) I'd be happy to help you.
Friday, August 7, 2009
Blueberries and a Great Berry Muffin Recipe
It's been such a long time since I last posted. Summer has been really busy and the garden is producing a ton. In the next few days hopefully I'll get around to posting some recipes with zucchini and tomatoes. Each day I come in my bowl/basket gets fuller and fuller. I love it. It's so nice to eat all the fresh things from the garden, and to also share it too.
Even though I don't have blueberries in the yard they have been on sale at the grocery store. I've bought two 2 lb containers for $3.99 each. Megan loves to eat blueberries as a snack. We go through about as quickly as raspberries. It makes me happy to see my child open up the fridge and go to the produce drawer. It makes me happy that she enjoys eating fresh fruits and veggies.
Freezing Blueberries (or any berry):
After washing and letting the blueberries dry I spread them on a cookie sheet. I put the cookie sheet of berries in the freezer. When they freeze I then convert them into a freezer bag, remove all the air and seal it shut. Not only are frozen blueberries great for using in recipes, but they make a really yummy and healthy snack right out of the freezer.
Berry Muffins
This recipe I got from my cousin Wendy a few years back. It is good with any berry (raspberry, bosynberry, blueberry, etc.).
Ingredients:
1 1/2 cups flour
3/4 cup sugar
1/2 teaspoon salt
2 teaspoons baking powder
1/3 cup vegetable oil
1 egg
1/3 cup milk
1 cup fresh berries (blue, black, raspberries)
1/2 cup sugar
1/3 cup flour
1/4 cup butter, cubed
1 1/2 teaspoons ground cinnamon
Directions:
1. Preheat oven to 400 degrees. Grease muffin cups, or line with liners.
2. Combine the 1 1/2 cups flour, 3/4 cup sugar, salt and baking powder. Place vegetable oil into a 1 cup measuring cup; add the egg and enough milk to fill the cup. Mix this with the flour mixture. Fold in the berries. Fill muffin cups right to the top and sprinkle with crumb topping mixture.
3. To make crumb topping: mixt together 1/2 cup sugar, 1/3 cup flour, butter and cinnamon. Mix with fork or pastry blender. Sprinkle over muffins before baking.
4. Bake for 20-25 minutes.
Wednesday, July 15, 2009
Green Beans
It's that time of year when things are producing quickly. Last weekend I pulled up my peas. Some of the plant were six feet long! I have never seen such tall plants before. They produced very well too. I think it was because of all the rain and cool weather this year. Underneath I had planted green beans. My peas had collapsed over the green beans because they were so heavy so some of the plants look a little sad. However, a lot of the bean plants already had beans ready to pick. I also made a trellis up the side of the shed next to the garden and planted pole beans. They are as happy as can be in that location. I love to eat beans in a lot of ways: steamed, stir-fried, etc.
One of my favorite bean recipes is a "copycat" recipe. If you go to TGI Fridays order the fried green beans, or make them at home. It's not the healthiest way to eat them, but they are so good! I got the recipe here: http://www.recipezaar.com/Copycat-Crispy-Green-Bean-FriesTgi-Fridays-191793. I also like the dip in grilled turkey burgers. It makes a great sauce.
Ingredients
Wasabi Cucumber Ranch Dip
1/2 cup bottled ranch dressing
1/4 cup cucumber, peeled, seeded, minced
1 tablespoon milk
1 1/2 teaspoons prepared horseradish
1 teaspoon cider vinegar
1 teaspoon wasabi powder
1/8 teaspoon salt
1 pinch cayenne pepper
Green Beans
1 egg, beaten
1 cup milk
4 cups vegetable broth or chicken broth
6-8 ounces fresh green beans
1 cup flour
1 cup plain breadcrumbs or seasoned dry bread crumb
3/4 teaspoon salt
1/4 teaspoon onion powder
1/8 teaspoon garlic powder
vegetable shortening, for frying or vegetable oil
Directions
1. Combine dip ingredients in blender. Blend until smooth.
2. Place in bowl; cover and chill till ready to use. Dip will thicken as it chills.
3. Place beans in the broth.
4. Bring to a boil and cook 15 minutes, then place in cold water to stop cooking process.
5. Mix beaten egg with milk in a shallow bowl.
6. Measure 1 cup of flour into another shallow bowl.
7. Combine bread crumbs, 3/4 teaspoons salt, black pepper, onion powder and garlic powder into a third bowl.
8. Take a handful of beans out of the water and shake off excess liquid.
9. Coat the beans with the flour, shaking to remove excess flour.
10. Dip the beans, one at a time, into egg/milk mixture, then dip in breadcrumb mixture.
11. Place the beans on a plate until all are coated.
12. Heat the shortening or oil to 350°F in a heavy skillet(or use deep fryer). Use enough to cover the beans, about 1 1/2 inches.
13. Fry until golden brown, about 1 1/2 minutes.
14. Drain on paper towels.
15. To serve, place on a large platter and serve with the wasabi cucumber ranch dip. Enjoy!
Monday, July 13, 2009
Raspberry Honey-Butter and Sixty-Minute Rolls
This is a recipe that I got from my sister Judy. I think it is the recipe that was used at the Inn at Temple Square in Salt Lake City. It's another really easy recipe.
1 lb. softened butter
8 oz. honey
8 oz. raspberry preserves
1 tsp. vanilla
Directions:Whip softened butter until very light and fluffy. Use a whipping paddle if possible. Whip in honey, then preserves and vanilla. Keep refrigerated.
This roll recipe I found a few years ago, probably online. I don't remember exactly where. This recipe is so nice because it really does only take 60 minutes, and they turn out really good. If you don't want to have them as rolls you can flatten out the dough and fry to make scones. Mmmm.
3 1/2 to 4 1/2 c. flour
3 tbsp. sugar
1 tsp. salt
2 pkgs. yeast
1 c. milk
1/2 c. water
1/2 stick butter
Directions:In a large bowl, mix 1 1/2 cups flour, sugar, salt and yeast. In a saucepan, combine milk, water and butter. Heat to very warm (120 to 130 degrees). Gradually add to dry ingredients and mix well. Stir in enough additional flour to make a soft dough. Turn out onto floured board and knead, about 5 minutes. Place in warm place to rise 15 minutes. Make rolls, put in greased pan. Let rise 15 minutes. Bake at 425 degrees, about 12 to 15 minutes.
Raspberry Buckle
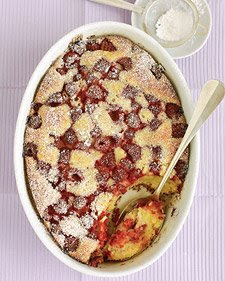
I actually got this recipe from the Martha Stewart website. I made it and served it warm topped with vanilla bean ice cream and hot fudge. It was quite the hit and so easy to make. Next time I might throw in either white chocolate or chocolate chips.
1/2 cup (1 stick) unsalted butter, room temperature, plus more for baking dish
1 cup granulated sugar
3 large eggs
1 cup all-purpose flour (spooned and leveled)
1/2 teaspoon salt
1/2 teaspoon baking powder
2 containers (1/2 pint each) raspberries (2 3/4 cups)
Confectioners' sugar, for dusting (optional)
Whipped cream (optional)
Directions
Preheat oven to 350 degrees. Butter a 2-quart oval or square baking dish. In a large bowl, cream butter and sugar with an electric mixer until fluffy. Add eggs, one at a time, beating after each addition to combine. In a large bowl, whisk together flour, salt, and baking powder; with mixer on low speed, gradually add flour mixture until incorporated.
Preheat oven to 350 degrees. Butter a 2-quart oval or square baking dish. In a large bowl, cream butter and sugar with an electric mixer until fluffy. Add eggs, one at a time, beating after each addition to combine. In a large bowl, whisk together flour, salt, and baking powder; with mixer on low speed, gradually add flour mixture until incorporated.
Spread batter in baking dish. Scatter raspberries on top. Bake until a toothpick inserted in center of cake comes out clean and top is golden brown, 45 to 50 minutes. Let cool 20 minutes; dust with confectioners' sugar, if desired. With a large spoon, scoop out onto serving plates; serve with a dollop of whipped cream, if desired.
Tuesday, July 7, 2009
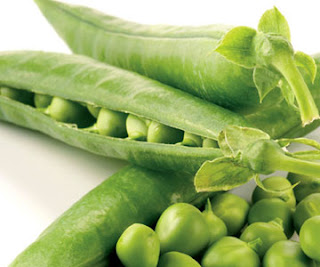
Raspberries and Peas
I have to admit that we don't often use fresh peas in recipes or for freezing. Why? Well, the reason why is that we pretty much eat what pick. There is nothing like fresh peas from the garden. Mmmm! I can't believe how much everything has grown this year, especially peas. Here in UT June was unseasonably rainy and cool. I only had to water my garden once in the month of June. It has been so nice. I staked my peas up as usual, but to my surprise they grew twice as high and ended up toppling over in a big mound. It's no problem really. I just have to hunt a little better, but hunting for fruits and veggies is one of my favorite things.
Raspberries - I have a confession to make. Do not throw rocks. I don't like many fruits because of the texture, however I love growing and canning them. Am I crazy? We've had a lot of rasberries so far this year, but my husband and daughter have been eating them almost as much as I can pick them. I'm finally getting enough berries that I might be able to make some things with them.
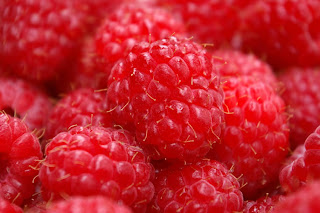
First thing I will make is raspberry jam. Be really nice and kind to me because I like to give away raspberry jam, and raspberry honeybutter. I also have a good recipes for things made with berries that I'll post when I finally get enough berries to make things out of them.
Jam - For those of you who haven't made jam before it's actually quite simple. Freezer jam is especially easy to make. If you are going to process the jam you will need canning jars, however if you are making freezer jam all you need are any kind of freezable containers. Freezer jam does not need to be processed, and you can store it in your freezer for a year. The most important thing you need (besides berries of course) is this:
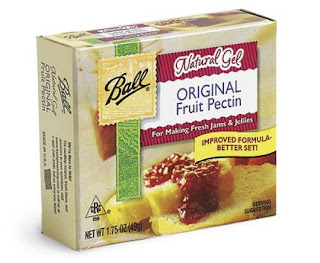
The brand doesn't matter much, but you do need fruit pectin. If you are doing raspberries you will need 3 cups of crushed raspberries. It's very important you don't double jam raspberries, because the pectin won't turn out right and you will end up with runny jam. I think by tomorrow I will have enough to start making my jam. I of course need to make sure I have enough to make the jam, and enough for my husband and daughter to eat for the day :)
If you want a great canning and freezing website, this one is one of my favorites: http://pickyourown.org/allaboutcanning.htm
Saturday, July 4, 2009
Squash Bugs
Here is another gross bug update. As I was walking through my garden yesterday morning I spotted this:
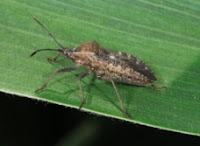 Not only were there one, but there were 4 groups of them mating. Nice. They are squash bugs. I have always joked that growing zucchini is like growing a weed. It's not very difficult to do. However, last year we were eating and enjoying our zucchini when I noticed this:

There were hundreds and hundreds all over the plant. I couldn't believe it. The next day my zucchini plant was completed wilted, and it took just a few more days until it completely died. The little critters were all over. Thank goodness we'd already had our share of zucchini that year.
 Not only were there one, but there were 4 groups of them mating. Nice. They are squash bugs. I have always joked that growing zucchini is like growing a weed. It's not very difficult to do. However, last year we were eating and enjoying our zucchini when I noticed this:
There were hundreds and hundreds all over the plant. I couldn't believe it. The next day my zucchini plant was completed wilted, and it took just a few more days until it completely died. The little critters were all over. Thank goodness we'd already had our share of zucchini that year.
However, this year I've been eyeing the zucchini I'm going to pick any day when I saw the aduts mating. I quickly did a search online for any organic way to get rid of them. A couple of suggestions were to put a board next to the plant. The next morning they will all accumulate under the board and you can quickly try to squash them, or throw them in a bucket of soapy water. Most online articles stated that it was always difficult to find or kill all the bugs so it is sometimes a worthless battle. I turned over the leaf and saw some eggs. I wasn't willing to risk it. While I try to grow things as organically as I can this called for drastic measures.
I'm pregnant and can't deal with insecticides so I got my trusty husband. I pointed to the insecticide powder I have in the garage. First we tried to kill what we could, then I had him apply it with a paintbrush I always keep in the bag on all stems, leaves (bottom and top). I also had him go to the cabbage because even though a few posts ago I said I didn't have cabbage worms I saw the moths flying around the garden, and I saw some eggs. I'll just make sure I wash my veggies good. Most of the insecticide will be gone by then anyways, but I'll make sure to wash and soak the veggies 3 or 4 times before we eat them.
Today, go to your garden, check pumpkins, summer squash, fall squash plants, and any kind of squash-like veggies to make sure you don't have them on your plants. They will totally demolish them.
Tuesday, June 23, 2009
Potatoes

This is my first year growing potatoes in the garden. My dad always grew them, but I decided to give it a try. I bought a variety of red potatoes. My father-in-law had told me a little bit about a neighbor he has that uses straw when he grows his potatoes. I'm a little late getting the straw down, but I finally got around to it. Part of my problem was finding a farm store that wasn't out of straw already. Here is a great article on growing potatoes in straw: http://www.gardeningknowhow.com/vegetable/tips-for-growing-potatoes-in-straw.htm
and here is a great article on growing potatoes in general: http://extension.usu.edu/files/publications/publication/HG_Garden_2005-13.pdf
My potatoes got planted later than I had planned. I wanted to plant them in april, but really they didn't get planted until the end of May. My plants are now about 6 inches high so I put the straw around the plants until just an inch of plants are showing. The straw (or if you choose to use dirt) helps to keep the potatoes from being green when they are harvested. For new (baby) potatoes they are ready to be harvested when the flowers bloom. If you want regular sized potatoes you wait until the vines die off. I've done some reading on different ways to plant potatoes. Some gardeners plant them in old, large nursery pots or garbage cans. I might actually give it a try next year.
Next year as I'm planting my garden I plan on documenting when I actually plant specific plants, and how I go about it. I didn't get this blog up and running until after things had been planted, however I do plan on trying fall cropping of some veggies.
Friday, June 19, 2009
Another Favorite Salad Dressing
My spinach may have bolted, but my salad greens are still doing well. I have two favorite salad dressing recipes. One is in the spinach salad below, and this one is like a creamy italian.
Ingredients
1/2 cup mayonnaise
1/3 cup white vinegar
1 teaspoon vegetable oil
2 tablespoons corn syrup
2 tablespoons parmesan cheese
2 tablespoons romano cheese
1/4 teaspoon garlic salt
1/2 teaspoon italian seasoning
1/2 teaspoon parsley flakes
1 tablespoon lemon juice
Directions
Mix all ingredients in a blender until well mixed.
If this is a little to tart for your own personal tastes please add a little extra sugar.
Bolting Spinach
 Well the time has come and my spinach officially went to seed and bolted. I had to pull it up yesterday. Spinach bolts and is no longer good when it starts to get hot out. I do have to say that with this rainy, cool weather my spinach lasted a long time. I enjoyed it for a little over a month. I'm going to try a fall planting this fall, so we'll see if it works.
Cabbage Worms and Moths?

Yesterday my venture in the garden was scoping out pests; one in particular. The cabbage worm or moth loves to eat and lay eggs on:
Brussels sprouts
Collards
Kale
Kohlrabi
Cauliflower
Turnips
Radishes
Mustard Greens
Rutabaga
Collards
Kale
Kohlrabi
Cauliflower
Turnips
Radishes
Mustard Greens
Rutabaga
Broccoli
If any of these plants are developing holes in the leaves, it's very possible that the cabbage worm has entered the garden. Fortunately we've had some huge downpours, and I hear this helps prevent the cabbage worm. This year I haven't seen them too much, but last year I had to get rid of these pests in the garden.
How to identify:
If your plant is getting holes in it, that can be an indicator. Another indicator are when you look under the leaf you might seen little green droppings or white eggs.
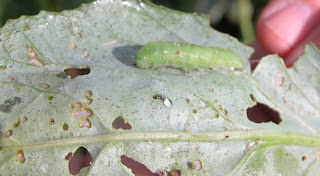

Another big sign that you potentially have a problem is if you see the green cabbage worm, or the moth that it turns into. The moth is what lays it's eggs on the plant.


How to get rid of these pests:
The best way of getting rid of them is to hand pick them and get rid of them. You just take any cabbage worms/eggs you see and pick them off the plant. This is a good job for the kids. If you are like me you could also treat with insecticides that you might find at a garden store. They have powders you can brush on, or sprays (some organic, some not).
I've also read another great organic repellent is a hot pepper spray. I've never tried that, but if cabbage worms come to grace their prescence this year I'm going to give it a try. You can make the spray by chopping or grinding hot peppers into fine particles. You then mix 1/2 cup of the grounded peppers with 1 pint of water and then strain out the particles to form a clear solution. You should spray the plants twice, 2 or 3 days apart. Just make sure the spray makes contact with the cabbageworm.
Wednesday, June 17, 2009
Favorite Spinach Recipes
Let me know if you have a favorite spinach recipe. Please e-mail me and I'd be happy to share. I love spinach in a lot of things (pizza, calzones, soups, salads, etc. etc), but here are two of my favorite spinach recipes.
Spinach Salad
I'm sure a lot of you have this recipe. It's quite popular around here. I have to recipes I use from time to time. They are both very similar
*I don't always use these measurements. The dressing is really good and you can use it with any/all/or additional ingredients or amounts. I usually half he dressing, store the dressing in a canning jar and use it as needed.
Salad:
1 bag or head of lettuce (I use mine from the garden)
2 bunches of spinach (more or less, also from garden)
1 purple oinon
1 lb mushrooms
1 lb bacon bits (I usually make mine without, but if I do I just fry up a few slices of bacon and crumble it up)
1 c. cottage cheese, drained overnight in a colander (optional)
croutons
chopped almonds (optional)
Dressing:
1/2 c. sugar
2 tsp. dry mustard
2/3 c. red wine or cider vinegar
2/3 c. oil - I use half vegetable, half olive
1 Tbs. poppy seeds
Toss the salad with enough dressing to coat just before serving.
Hot Spinach Artichoke Dip
This recipe is not healthy, but it is so good. I like to eat it with french bread, pita bread, or crackers.
Ingredients
1 (10 ounce) box frozen spinach chopped, thawed (I just cook and chop my fresh spinach)
1 (14 ounce) can artichoke hearts drained and roughly chopped
1 cup shredded parmesan-romano cheese mix
1/2 cup shredded mozarella cheese
10 ounces prepared alfredo sauce
1 teaspoon minced garlic
4 ounces softened cream cheese
Preheat oven to 350 degrees.
Combine ingredients thoroughly in a bowl and spread mixture into a small baking dish (I used an 8" X 8" dish).
Bake for 25-30 minutes or until cheeses are bubbling and melted.
Freezing Spinach
There are a couple of ways of freezing spinach. I don't usually get around to freezing it because we usually eat or give most of it away.
My sister Lisa told me that she takes her fresh, washed spinach and just throws it in a freezer bag. Then when it freezes she opens the bag, crumbles it while it's in the bag and then removes the air and freezes. She sneaks it in to things like spaghetti sauce, casseroles, and soups. I also do this. My daughter and husband both like spinach so I guess it's not necessarily sneaking it in, but it always adds extra nutrition to things.
I read online somewhere that freezing without blanching isn't the most nutritious way. I read that all veggies have enzymes and bacteria that break down the nutrition and taste over time if they aren't blanched. I need to look into that a little more. To blanch greens you should get a pot of water boiling. Throw the spinach in the pot and let boil for 2 minutes. Immediately take it out and put in an ice water bath. This is to stop the cooling. Then you could bag the greens, but I might suggest freezing on a cookie sheet lines with wax paper before you put it in the baggie. That way it won't end up as a big lump of spinach. You could also try to crumble it after you put it in the bag.
Storing and Cleaning Spinach
 I'm probably making this post a little late as my own spinach is starting to go to seed. I guess it's time to pull it up. Here are a few tidbits about spinach:
Washing and Storing
I usually clip my spinach with scissors and then put it directly in my salad spinner basket. Do you have one of these? I love them! Thanks to my sister Judy who gave me one quite a few years back. It is one of my favorite kitchen items.
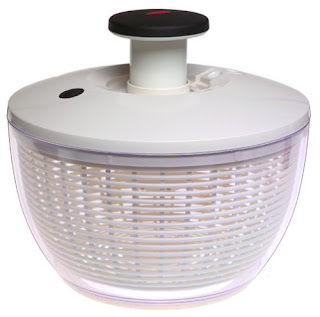 Google it and find out more about it. Basically it's great for storing and washing any kind of greens, and it stores them for a very long time.
Back to the spinach:
If the spinach is a small batch I just fill the bowl of the salad spinner with water and place the spinach in the basket. If it is a large batch I usually put it in my sink and soak it in water. As it soaks in the water I swish it around every so often. The sand and dirt will go to the bottom of the bowl or sink. I then empty the water and repeat about 3 times. I don't know if it's just me, but I find the spinach collects a lot of dirt and needs it. If you have a salad spinner throw the spinach directly in the basket (with the bowl empty of water) and spin it. It will dry all the leaves. If you don't have a spinner just use a strainer/colander and then dry w/ paper towels. If you have a small batch of spinach growing in the garden you could probably just store it in the strainer.
I have a lot of spinach and lettuce growing in my garden so it doesn't help me to store it in the spinner, as I use the spinner a lot. I take a gallon sized ziplock baggie and place the dried spinach inside. I also fold two paper towels and put them on both sides of the bag. This helps keep the moisture away from the spinach and it lasts a lot longer. I have 1 bag of spinach that has easily been in the fridge for over 2 weeks, and it is still as crisp and fresh as the day I packaged it.
** Note: This method works well for storing any greens.
Subscribe to:
Posts (Atom)
